Python statistics and analytics

I saw two links on Python for statistics this morning, and that made me think that I should share those and the libraries I know of for doing analytics in Python.

First of all, the ones that inspired the post:

Statistical analysis made easy in Python with SciPy and pandas DataFrames. This post is a neat summary of how to work with multiple tables of sampling results in a concise manner using tools that are readily developed.  No more reading in CSV files line by line, doing your own conversions of values, and then writing statistical routines that you later have to optimize.  This and the library mentioned in the comments will get you so much further, and both incorporate and extend numpy and scipy, so you can write your own optimized routines that use the components from these libraries.

Finally, since this is a spatial blog, I want to point out Luc Anselin and ASU’s excellent routines for Spatial Analysis, PySAL.  These routines provide clustering, smoothing, computational geometry, spatial weighting, econometrics, and dynamics functions. The computational geometry routines are of a different class than those that appear in Shapely, but that is not to dismiss Shapely, which is an excellent library for handing the kinds of transformations and spatial joins common in everyday analysis.

As for what Geoanalytics uses in its core functionality, we have:

  • Shapely – computational geometry.
  • Numpy – numerical computation over rasters and irregular grids, palleting.
  • Scipy – interpolation, image processing.
  • Numexpr – high speed bulk arithmetic on arrays.
  • Pandas – Paired with OGR, an array interface to feature collections.
  • GEOS – toplogy and transformation library inspired by the JTS.
  • GDAL/OGR – file format conversions, spatial indexing.
  • Spatialite3 – Spatial indexing.
  • PostGIS – GIS in Postgres, used by the GeoDjango ORM layer
  • GeoDjango – Geographic extensions to Django.

Scientists write analytics in a wide range of languages and frameworks, however, including Fortran, GRASS, C, and Java.  Because of this, Geoanalytics is decoupled from the underlying analytics platform giving scientists the independence they need to incorporate their existing models and analytics.  Geoanalytics instead focuses on providing source data and publishing results in common, easily accessible formats, executing computations on marshalled computational resources, and providing the framework for new geographic analytics software written in Python.

New release of The Big Board

So you can make a map, but what do you do with it when you have it?  The Big Board attempts to answer that question with a collaborative environment that lets you layer your data with others’ data, and provides “teleconferencing” like facilities over that.  These teleconferencing facilities include annotating the map, a discussions tab for instant messaging of participants, customizable controls, and a customizable catalog of overlays containing your data and other people’s data to layer onto a base map.  All this is done in a web-based platform that operates on any modern browser, including tablets like the iPad and Android-based Motorola XOOM without plug-ins, special exemptions by the IT department, or other setup.  The Big Board is written entirely using HTML5 and Javascript on the front end and uses RENCI’s Geoanalytics platform as its backend.

The Big Board is mobile-enabled from the ground up, giving you the ability to see the same interface, scaled and adjusted for touch-interaction, on your tablet as well as a desktop.

To begin with, a user creates a conference room, gives it a name, and assigns it a base-map layer (by default, Google), and then clicks a button to create the room and join the conference.  Then one is presented with the base map and a number of tabs along the bottom of the screen explained in more detail below.

The base map

Showing a participant’s location on the map

The base map is simple enough.  You will be asked to share your location by the browser, and you should click “yes” to put yourself on the map (if you click no, you will be shown in that unique location just west of Gabon and south of the Ivory Coast known where the prime meridian and the equator intersect: lat/lon 0.0, 0.0.)  Drag your mouse (or your finger!) to pan, and pinch or use the buttons to zoom in and out.  The map should scroll and zoom smoothly and you should see yourself as a cross above your current location.

The Overlays tab

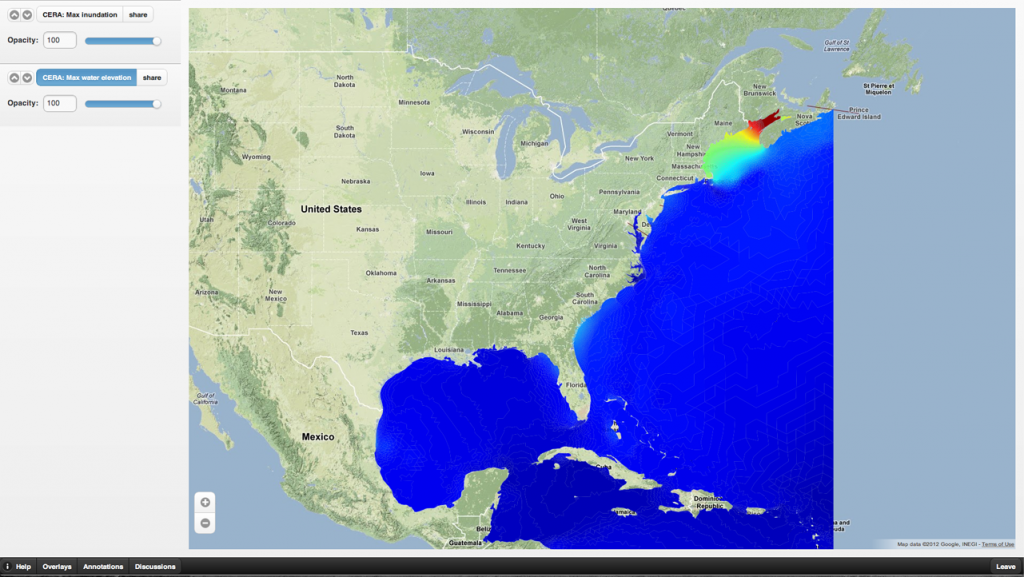
The Big Board opens to the Overlays tab.  This is how you get large quantities of data onto the map.  An overlay can be taken from any number of standard services on the web, or can be provided by the Geoanalytics framework using your own data.  Clicking on the button with the overlay name will display it on your map.  Clicking on the “share” button next to that will put it on the map of all the participants, showing them the same view you have.  Dragging on the slider below the overlay name will change the transparency of that overlay.  Clicking on the up or down buttons to the left of the overlay will raise or lower the overlay above or below others that are turned on.

The Annotations tab

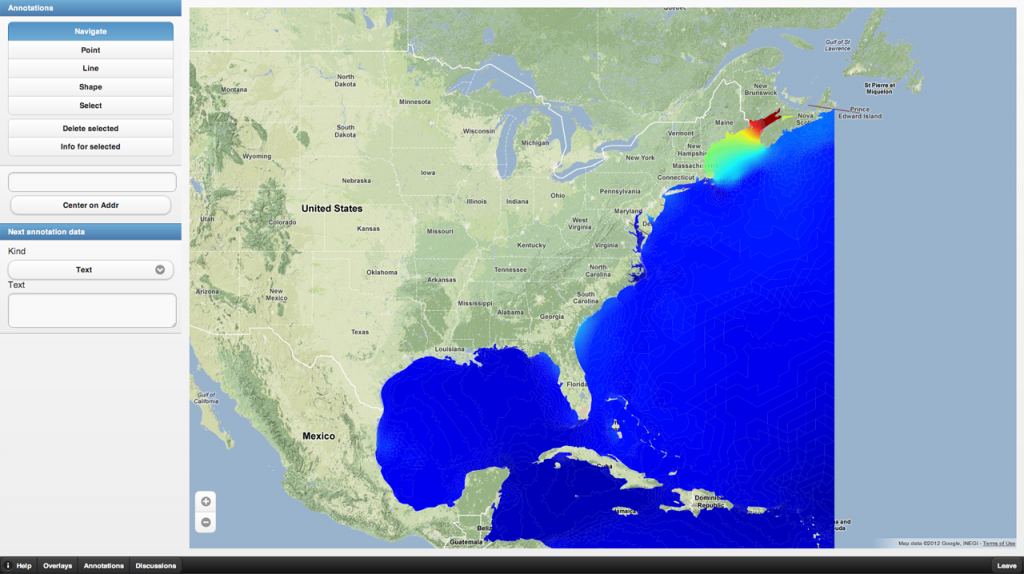
Moving to the right of the Overlays tab is an Annotations button.  Click that and you will find yourself presented with these controls:

The annotations controls, and any custom controls provided by the administrator to your conference room are contained on this tab and provide ways to query and mark up the map. To add an annotation, first type any text or upload any files you want to add under the heading “Next annotation data”. Then click on one of the controls: Point, Path, Shape.  From there, you can click on any point on the map and the next annotation will contain the text / image / video / audio / PDF file or what have you that you uploaded.  Special note: if you want “freehand” drawing of paths and shapes, hold down the shift key while you draw. To get at these annotation data, move down to “Select” and click that, then click on any annotation on the map until it’s highlighted blue, and then click “Info for selected” to get an overview of the data associated with the annotation.  The “Center on address” feature will let you type in an address and

The Discussions tab

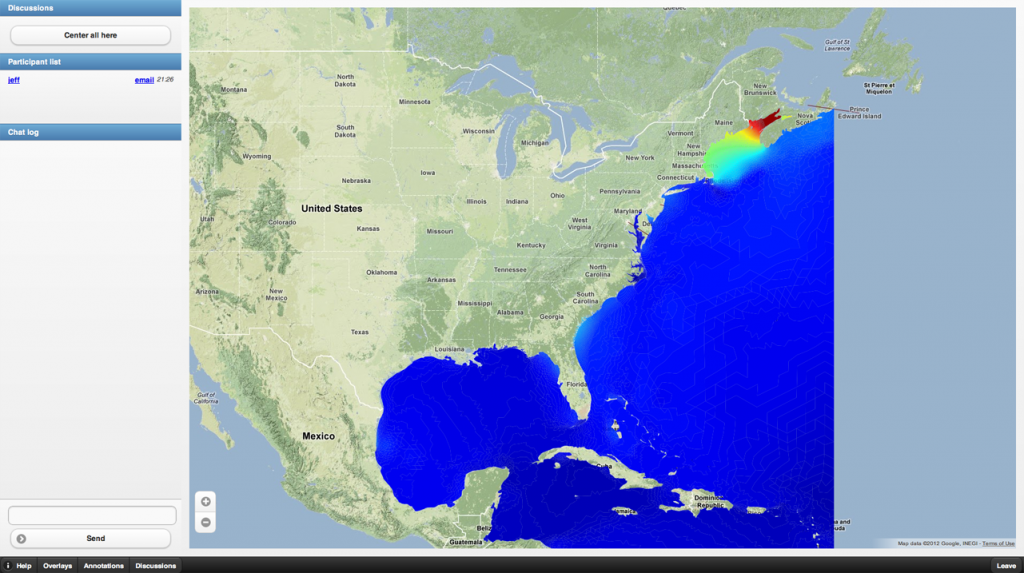
Finally, the discussions tab gives you the ability to locate your other participants and chat with them.  Click on any participant’s name to center on that participant on the map – helpful especially for highly mobile participants.  Clicking on the “center all here” button will re-center the conference room to this position for everyone, including new users, and let you call out or point to something on the map exactly as you see it.  The chat window allows you to type messages to your fellow participants.

Wrapping up

The Big Board is part of RENCI’s Geoanalytics platform, and is available Open Source under the RENCI (MIT-style) license.  You can reach the source code, as well as the source code for other Geoanalytics projects on GitHub.  Please feel free to add ideas and comments at the bottom of this post!


Styling WMS with Geoanalytics – A demo

Okay, so why would you prefer to do it the Geoanalytics way over using SLD?  Because you can do this using just the stylesheet:
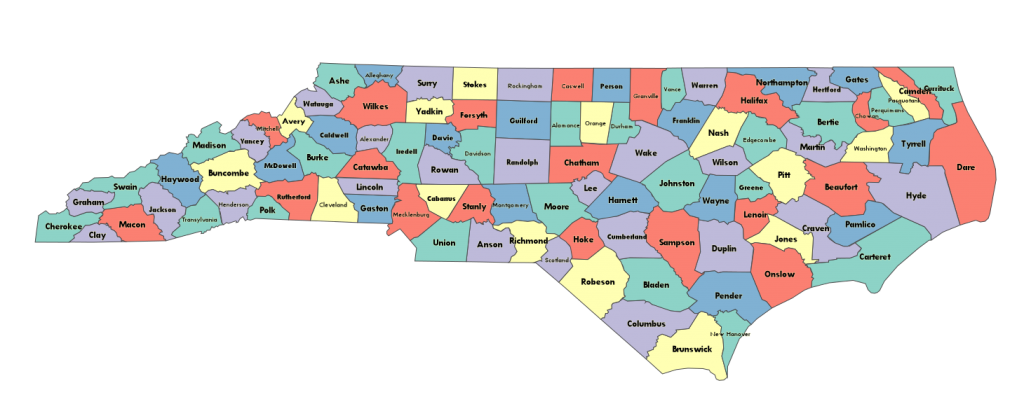
That is to say you can do the five-coloring and the county-width based font sizing in the styler alone.  Now, truth be told you should compute the five-coloring ahead because it requires a rather large number of comparisons.  What I’m going to detail in this tutorial is not the best nor most efficient way to do things, but rather a demo of the kinds of things you can do, whether or not you really should.  First off, let’s look at the WMS query that brings this back.  I have the entire county listing for the United States in the database here, and I’m only showing the counties of North Carolina.  I do that with a filter parameter.  There are others that will work, but this is based off the TigerLINE 2010 data and I knew that it would work:

http://localhost:8000/iei_commons/wms/?service=WMS&request=GetMap&version=1.0.0
    &bbox=-85,30,-75,38
    &format=png&layers=the_geom
    &width=1536&height=1280
    &srs=EPSG:4326
    &styles=fancy
    &filter={"geoid10__startswith":"37"}

I’ve broken things up across multiple lines so they’re easier to see, but take note of the filter, because it’s not CQL.   Filtering in Geoanalytics follows the same rules as filtering in Django or Tastypie.  (Nearly) any legal filter in Django will work on the URL line in Geoanalytics.  Filters are expressed as JSON documents and can contain any number of clauses.  37 is the FIPS state code for NC, so I simply wrote a filter of “geoid10__startswith” : 37.  Filters are applied after the geographic filter in Geoanalytics, so they tend not to be too expensive.  If you’re using an indexed field, they’re even cheaper.

So in rendering this, I did not modify the table beyond the default shapefile import of the US county census data as downloaded from census.gov.  The five coloring is done on the fly.  The font sizing is done on the fly.  How?  Here is my styling code.  This is put in views.py:

import csp
import json
import os

palette = [(a/255.0,b/255.0,c/255.0,1.0) for a,b,c in [
    (141,211,199),
    (255,255,179),
    (190,186,218),
    (251,128,114),
    (128,177,211)]
]
colors = {}

def calculate_colors():
    global colors, palette
    if os.path.exists("colors.json"):
        colors = json.loads(file("colors.json").read())
    else:
        adj = dict([(county.geoid10, [s.geoid10 for s in CensusCounty.objects.filter(the_geom__touches=county.the_geom)]) for county in CensusCounty.objects.all().only('the_geom')])
        problem = csp.MapColoringCSP([0,1,2,3,4], adj)
        solution = csp.min_conflicts(problem)
        for s, c in solution.items():
            colors[s] = palette[c]
        with open('colors.json', 'w') as f:
            f.write(json.dumps(colors))

def five_color(data, _):
    global colors
    if not colors:
        calculate_colors()
    return tuple(colors[data['geoid10']])

def county_label(data, _):
    return data['name10']

def stroke_width(_, pxlsz):
    k = 1./pxlsz
    if k > 1:
        return 1
    elif k < 0.3:
        return 0.3
    else:
        return k

def font_size(data, pxlsz):
    minx, miny, maxx, maxy = data['the_geom'].extent
    width = (maxx-minx) / pxlsz
    length = len(data['name10']) * 10.
    return max(10, min(14, (width/length) * 12))

fancy_county_styler = styler.Stylesheet(
    label = county_label,
    label_color = (0./255.,0./255,0./255,1.),
    font_face = 'Tw Cen MT',
    font_weight = 'bold',
    font_size = font_size,
    label_halo_size = 1.5,
    label_halo_color = (1.,1.,0.7,0.4),
    label_align = 'center',
    label_offsets = (0, 5),
    stroke_color = (72./255, 72./255, 72./255, 1.0),
    stroke_width = stroke_width,
    fill_color = five_color
)

class CensusCountyWMSView(WMS):
    title = '2010 TigerLINE Census Counties'
    adapter = GeoDjangoWMSAdapter(CensusCounty, simplify=True, styles = {
        'default' : default_county_styler,
        'fancy' : fancy_county_styler
    })

class CensusCountyDeferredWMSView(CensusCountyWMSView):
    task = census_county_renderer

Now this could have been done better, to be sure.  For one thing, the first time someone uses this the computation of the five-coloring takes forever.  There are better queries that could have been used to determine the adjacency matrix, and it could be calculated once at the time that the data is loaded and stored in a file or in a separate table.  But this is an illustration of the power of fully programmable styling as opposed to the kind of styling you can specify in an XML document.

So let’s break this down a bit.  The palette variable is just a dictionary we use to populate the color table for each of the counties.  It contains four-tuples of colors (taken from colorbrewer2.org).  We define a calculate_colors function that sets up a consrtaint-satisfaction problem for five-coloring a map.  This is called once for our map, and should properly save the file to some sane, safe location and not “colors.json”, but no worries for now.

Then we have four functions that style particular properties of the data.  They are:

  • five_color, which looks up the color in our cached map of colors and calculates colors if no map exists.
  • county_label, which simply returns the name field from the data.
  • stroke_width, which scales the stroke width slightly so that extremely zoomed out views don’t have the outlines overcrowd the view and extremely zoomed in views are too boldfaced.
  • font_size, which checks the extent of the geometry that the label will be rendered onto and then scales the font so that it (mostly) fits inside each county.

Finally, we create a stylesheet, fancy_county_styler that uses all our functions to dynamically style the data.

Now, you may argue, “But Jeff, I can simply append color and font size to the data and use an SLD stylesheet to achieve the same thing,” and you’d be right, but this and other issues like it are at the root of how so many copies of data end up existing when one copy of that data would do (locally cached, but unmodified, of course).  It’s a simplification, and honestly styling data should not be part of the underlying data model.  It blurs the MVC boundary and that ends up leading to siloed applications that can’t talk to each other because everyone has different requirements for their views.

Major updates to OWS and the Pyramid model

Folks, I have checked into GitHub a lot of stuff that needed updating for quite some time.  The ga_ows application now “officially” supports WMS – as in there’s documentation on how to use it now.  WMS has been modified significantly to be in line with the way WFS works.  There are numerous speed and efficiency improvements in GeoDjango’s WMS implementation.  Other big news is that there is now Celery support for WMS’s rendering step, meaning that you can do a number of cool things, including:

  • Render WMS tiles on a cluster
  • Pre-cache WMS requests that are common
  • Use the WMS renderer to populate a Pyramid instance (requires manual coding) instead of using gdal_retile.
The (reasonably) complete list of changes:
ga_ows:
  • Simplify the creation of WMS instances and put them more in line with other Django Generic Views (tutorials on this will come in due time)
  • Added documentation: ga_ows.rendering.styler, ga_ows.rendering.palettes, ga_ows.rendering.geodjango_cairo_renderer, ga_ows.views.wms. ga_ows.utils
  • Removed ga_ows.views.wmsconfig
  • Added support for caching via a WMSCache class
  • Added support for caching by default into the GeoDjangoWMSAdapter class
  • Added support for a new keyword parameter to WMS, “fresh”, which is a boolean parameter when set to true will force the rendering of a new image and refresh the cache at the same time.
  • Added “name” and “required_fields” keyword argument to the styler.Stylesheet constructor. “required_fields” gives the query engine hints as to how to make the query more efficient for rendering.
  • Added “simplify” keyword argument to GeoDjangoWMSAdapter.  Simplify is false by default. Given “true” it uses GEOS simplify to reduce geometry complexity for rendering LineString and Polygon objects
  • Added tastyhacks.py to allow GeoDjango models to expose RESTful APIs that return GeoJSON instead of plain JSON.
ga_pyramid
  • Updated to support GetCapabilities
  • Removed “application” and “cls” parameters from the Pyramid’s WMSAdapter class.
New documentation can be found at:
  • http://www2.renci.org/~jeff/docs/ga_dynamic_models
  • http://www2.renci.org/~jeff/docs/ga_ows
  • http://www2.renci.org/~jeff/docs/ga_irods
I will attempt to get some tutorials up for using WMS in the next two weeks.

Dynamic models in Django

This module is a hack.  There’s no doubt about that.  But it’s an interesting hack, so I’m posting it and sharing the code in the hopes that it will be useful to people.  If you have a mongodb database installed as well as your regular Relational DB setup, you can use this reusable Django app to create models in the ORM dynamically.  That is, you can add them programmatically through the methods found in ga_dynamic_models.utils, and they will show up in your admin tool.  You can also use this same mechanism to dynamically add TastyPie RESTful apis, so you can create / update / delete model instances dynamically.  Furthermore, it interacts with ga_ows to allow you to create APIs that return data as GeoJSON instead of just plain old JSON if you have GeoDjango models.

So… How does it work?  This app just contains the barebones mechanisms for declaring these models.  It makes no supposition about how you’re actually going to expose that functionality to a user.  One example view is given in ga_dynamic_models.views.csv_upload, but the idea is that you will want to craft your own ways for creating models.  This framework is also generic enough to encompass anything that follows the Django ORM pattern roughly – that is, if it declares fields as part of the class declaration and optionally includes an embedded “meta” class, then this framework can be used to create those dynamically.  Oh, and by the way, actual Django Models are automagically added to the admin tool.

The one caveat is that although the tool is capable of running syncdb, it does not yet use South and therefore no migrations are available.  One could potentially do this, of course, but I haven’t gotten that far yet.  Also you must restart the server somehow after models are added or they won’t show up in the tools.  This may change when Django supports Python3 and the module cache can be invalidated, but right now, i’m not sure how to accomplish the hack of making sure that the models propagate to all worker processes.

Now that I’m done admonishing my work for it’s hackitude, however, let’s look at how one might actually declare a model:

from ga_dynamic_models.utils import *
declare_model(simple_geomodel('MyGeoModel',
 geom = simple_geofield('PointField'),
 some_name = simple_geofield('CharField', max_length=255, default='', null=True, db_index=True),
 some_integer = simple_geofield("IntegerField", default=10)
))
declare_model(simple_model("MyRegularModel",
 some_name = simple_field('CharField', max_length=255, default='', null=True, db_index=True),
 some_integer = simple_field("IntegerField", default=10)
))

And this is how you would declare a TastyPie resource:

declare_resource(simple_model_resource(
 'ga_dynamic_models.models',
 'MyRegularModel',
 "my_regular_model"
))
declare_resource(simple_geo_resource(
 'ga_dynamic_models.models',
 'MyGeoModel',
 'my_geo_model'
))

The call to declare_resource inserts the resource into the MongoDB collection.  The associated simple_* calls are simplified ways of creating the resources.  For more information and more general ways of creating resources, models, and other ORM style classes, see the project documentation and download the code on GitHub.

Geoanalytics’ IRODS connector

The code is here.  The documentation is here.

The IRODS connector makes Geoanalytics, and really Django in general able to access IRODS through the icommands interface.  All the icommands are setup as Celery tasks so that they don’t block your server worker processes, and so you can distribute iRODS tasks across multiple machines.  What is IRODS, you ask?  Well, somewhat informative is www.irods.org, but if that doesn’t make sense to you, suffice to say it’s a relatively easy to use system for

  • Exposing a filesystem securely over the internet
  • Archiving data
  • Attaching metadata to files
  • Attaching rules to files, directories, users, and groups that will manipulate data.   This can be used for things like:
    • Change the format for a particular user when s/he  accesses a file
    • Move or delete a file when it ages out of usefulness
    • Start a process when a particular collection of files is present.


Prepping a Geoanalytics install on CentOS 6

This is the first revision of this tutorial.  There are likely to be mistakes, omissions, errors, and gaffes. If you get to the end and nothing works, comment on the post and I will endeavour to fix the problems.

Getting geoanalytics up and running on CentOS-6 is still a bit involved, but has been much simplified with the addition of an installer.  The installer can be downloaded from GitHub here

1. Setup a fresh CentOS-6 or RHEL VM.

This doesn’t have to be anything fancy.  In fact, I would recommend setting up the most basic, minimal CentOS, as the installer will take care of making all the proper packages show up.  You don’t want an existing webserver or database server on there, as this will only make for confusing errors down the road.

2. Download ga_prep and start the installer

$ wget https://github.com/JeffHeard/ga_prep/zipball/master
$ unzip JeffHeard.zip
$ mv JeffHeard* ga_prep
$ cd ga_prep
$ sudo ./install_ga-centos6.sh

Make sure to run as root or everything will blow up!!

3. Installing geoanalytics

Now things will begin installing.  The installer first takes care of adding a couple of repositories for you, including the ELGIS repository, which contains the RPMs for most of the OSGeo toolchain, and the 10gen repository, which contains the latest stable version of MongoDB.  Then it prompts you to install RPMs.  If you have a custom setup system with GDAL, PostGIS, GEOS, HDF5, NetCDF, and so forth, you may not want to let the installer perform this part.

From there, the installer installs an updated version of GDAL that includes support for building python extensions.  The ELGIS gdal is incompatible with the latest GDAL python bindings, and will need to be replaced.

Then the installer will update the /etc/profile with some extra paths that are necessary, including those for GRASS and for locally installed libraries.

Next the installer begins installing Django in a Python virtual environment. The installer creates a django user (and prompts you for a password) whose home is /opt/django.  The virtual environment for geoanalytics will be /opt/django/apps/ga/current.  To operate within this environment later, type:

$ sudo su django

Once the virtual environment is setup, the installer install the geoanalytics basic codebase.  Then it will ask you if you want to install PostGIS.  If you are running everything on the local machine, because you’re just experimenting with Geoanalytics, or you have a small installation, then you will want to answer “y” to this.  If you choose to answer “n” either because you want to setup PostGIS yourself or you have an existing PostGIS installation already running, you will merely want to make sure the following preconditions are true for your installation of PostGIS:

  • The DATABASES parameter in /opt/django/apps/ga/current/ga/settings.py is setup to point to your PostGIS installation
  • A PostGIS template database is loaded into the database (this is important for test running)
  • Your PostGIS’s pg_hba.conf is configured to allow connections coming from the geoanalytics machine (this may be obvious, but I’ve forgotten it enough times that it bears repeating).

Then the installer will ask you if you want to install MongoDB.  MongoDB can be quite complex to setup if you are creating a sharded, clustered instance of MongoDB. This installer assumes that you are creating the most basic installation of MongoDB possible.  If you are interested in a more robust solution, answer ‘n’ to this question and go to the MongoDB website for more information on a clustered configuration.  The basic configuration will work, however if you will be serving significant web application loads, you will want to move MongoDB off the same machine that PostGIS is on.

When you have your MongoDB server figured out, add the following lines to your settings.py file:

import mongoengine
mongoengine.connect('geoanalytics', host={server}, port={port})

Finally the installer will ask you if you want to setup the task broker on this machine.  If everything is running on the same machine, then the answer to this is “y”.  The task broker is relatively lightweight.  It handles apportioning Celery tasks among nodes of the Geoanalytics cluster.  There need be only one task broker, so if you are running this installer on multiple machines, you only need to answer ‘y’ to this once.  Just be sure to add the following line in your settings.py file once you have your broker figured out.  Note that it is possible to use the task queue “unbrokered” in which it uses the Django ORM, but this is much slower and has reduced functionality:

BROKER_URL = "amqp://geoanalytics:geoanalytics@{hostname}:5672//"

And that’s it!

3. Post install instructions

There are a number of things that should be done after the installer has finished.

  • Setup Celery the way you want it.
If you are using Celery, you should add autostart=true and autorestart=true to the  [celerycam] and [celerybeatd] applications on exactly one machine of your geoanalytics cluster in the file /opt/django/configs/supervisord/myapp.conf .  Usually this will be the “headnode”
  • Setup nginx the way you want it.
If you are using multiple machines for Geoanalytics and you want to load balance among the servers, there are a number of ways to go about it.  You may want to setup nginx to round-robin between servers.  This can be handled via the standard nginx configuration file, which is described on nginx.org
  • Setup MongoDB the way you want it.
If you want a clustered instance of MongoDB, because you need more space than you have on your main machine, or you want better resilience or throughput, go to mongodb.org and follow their instructions.
  • Sudo to the django user and do the following:
$ cd $VIRTUAL_ENV/ga
$ python manage.py collectstatic
$ python manage.py syncdb
$ supervisorctl restart ga

Finally, RedHat and CentOS generally firewall everything but ssh by default.  You will want to add rules to iptables to open your machine to port 80 and 443.  Also, if you’re running a geoanalytics cluster, you’ll want to make sure that all appropriate database ports are visible between the machines of your cluster.  To setup just port 80, you need a rule like this:

$ iptables --new Bills-Chain
$ iptables --insert INPUT 1 --jump Bills-Chain 
$ iptables -A Bills-Chain -p tcp --dport 80 -j ACCEPT

Once you do all this, you should be able to surf to your host and get a 404 page that gives you a list of valid URLs, like “^/admin” If you get that, you’re done with this tutorial!  From here you can write your own GeoDjango apps using the Geoanalytics core libraries.  As I publish new source code on GitHub, I will go into detail about how to use the libraries.


Extending OWS for time, elevation, and versioning

WMS and WFS have had extensions for Time for sometime, but I found these to be insufficient for my purposes.  For one thing, in these extensions, there is no way to query the service for what timesteps are valid.  Some services define values for continuous time.  Some services have exact values for certain times and interpolate for others.  Some services define values over over certain specific times.

To compensate for this, I first added a new call into the Geoanalytics implementations of WFS, WCS, and WMS called GetValiidTimes.  Since the time domain can be quite large, the call can be filtered in the same way as a GetFeature, GetCoverage, or GetMap call, including a layers parameter.  The return is a JSON(-P) document that contains a list of all valid timesteps and or pairs of times over which a continuous interval is defined.  If exact timesteps exist within a continuous interval, these are taken to be exact as opposed to interpolated values.

For example, the following query:

http://localhost/ndfd/wms?service=WMS&request=GetValidTimes&layers=apt&time__gte=2012-01-01&time__lt=2012-01-02

Might return a list like this:

[ { begin: "2012-01-01 00:00:00+0000", 
    end: "2012-01-02 23:59:59+0000" },
  "2012-01-01 00:00:00+0000",
  "2012-01-01 01:00:00+0000",
  "2012-01-01 02:00:00+0000",
...
  "2012-01-01 23:00:00+0000" ]

The filtering on the URL includes time__gte and time__lt components.  Geoanalytics implements filtering in an alternative way to CQL, using a filtering style found in REST frameworks such as Rails or Django.  These bounds bracket the times that will be returned by the webservice, since some webservices could have years of hourly data, causing a download of tens of thousands of dates per year.

While a result-set of that magnitude is fine for some archiving applications, interactive applications using the service would suffer severe lag, so we allow filtering to contrain the set of times returned.  Additionally, some layers may have data points defined for only certain times, and this allows a user to interpret time for a given layer context correctly.

From here, it is straightforward to define three more calls, GetValidVersions and GetValidElevations.  GetValidElevations works in exactly the same way as GetValidTimes, except it returns numbers instead of strings that can be parsed as dates.  Units are not returned, since these are generally specified in the Capabilitles document associated with a web-service.

GetValidVersions returns freeform strings, but never defines continuous fields since these make very little sense.  Additionally, because multiple versions may be defined for a single time, and because versioning can be so granular, GetValidVersions returns version strings contrained to specific times like so:

[ "2012-01-01:00:00+0000" : [ "v1", "v2", "v3" ], 
  ... ]

These times, elevations, and versions can then be used in accessing the service with the time, elevation, and version parameters in the GET or POST call.

Image Pyramid data model released on GitHub

The Geoanalytics Image Pyramid, ga_pyramid has had an initial release on GitHub today.  With this release, you can store tiled image pyramids, like the kind used to store the satellite imagery of Google Earth.  Features of ga_pyramid that you may not find in other packages:

  • Supports 16 and 32 bit images, including floating-point images.
  • Supports adding time and elevation dimensions to the pyramid.
  • Supports very-large pyramids via sharded MongoDB collections.

Future releases will concentrate on flexibility and performance, but this initial cut seems useful enough to announce as a release.  Find it on GitHub